Inserting Image in HTML Page
Photo is an essential thing when you are to make a web page look beautiful. Images is not just for making website background, but for other purpose like; dynamic user profile picture, post content picture. The list is endless.
That’s why I always tell my readers that, learning how to add image to web page is important.
I’m really happy to tell you that today we are going to add image on html web page.
Basically, there are three method for adding image/photo to html page. We’ll cover these easy three steps in this guide.
In one of our past guides, we discuss on how to style html page. We learnt three ways, which are “inline styling” “eternal styling” and “external styling”. Same thing apply to adding image on html page.
What is HREF in coding?
What is HREF in coding?
Method 1:
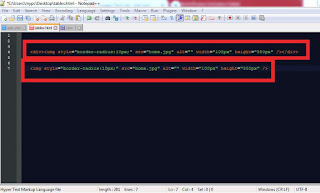
This method is very simple. We’ll make div element and add image as the background-image for the div. This background will only cover the shape of the div. In other words, it will only take the place the div occupy.
See code example below!
The above code makes the image cover 100px width and 300px height. The more you increase the width and height, the more the image will increase.
The code below just add the image on the web page without using the div element.
Attributes explanation:
1. Src (Is the source where the image is located).
2. Alt (Is the alternate of the image. For example, if the image fail to load or show on the web page, the text you enter into the alt will show).
3. width (The width is the length of the image).
4. Weight (The weight is the height of the image).
Method 2:
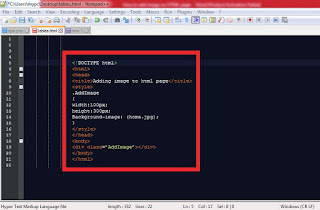
Guys this method, we’ll add the image in the head section using eternal css styling.
Just as the above example code, we’re still going to use the div element but going to put the image through eternal styling method.
See code example below!
<!DOCTYPE html>
<html>
<head>
<title>Adding image to html page</title>
<style>
.AddImage
{
width:100px;
height:300px;
Background-image: (home.jpg);
}
</style>
</head>
<body>
<div class=’AddImage’></div>
</body>
</html>
I decided to write down the entire code to make you understand the process.
First, I make the div element, gave it class name (AddImage), then style the class in the page head section.
Method 3:
Now this is the last method we’re going to deal with in this guide. Just as the external styling sheet, we will make two files, one is homepage.html and the other is stylesheet.css.
To get more understanding about this method, you need to check how to link external styling.
See example code for stylesheet.css file!
.AddImage
{
width:100px;
height:300px;
Background-image: (home.jpg);
}
</style>
Save the above code as stylesheet.css
Web design guide for beginners
Make sure both homepage.html and stylesheet.css are located the same folder
See the example code for homepage.html file!
<!DOCTYPE html>
<html>
<head>
<title>Adding image to html page</title>
<link ref=’stylesheet’ type=’text/css’ href=’stylesheet.css’ />
</head>
<body>
<div class=’AddImage’></div>
</body>
</html>
Now the new thing here is the css external file linking code. Below the attributes are explained:
1. Ref (This is the reference file which is stylesheet).
2. Type (This specify the type of file which is text/css).
3. Href (Hypertext Reference, which is referencing to the css external file).
So these are the easy steps to add image/photo to html pages.
Feel free to ask questions base on things you are not getting right, and share to others.


Good article though
ReplyDeleteYeah
DeleteThanks for the lecture
ReplyDelete