Posts

How to use HTML lists elements

Image
 In one of my posts, I taught you how to make table and I also stated that table can be use to hold items or names of people. But in case you are not okay with table, you also have html lists elements. What really make list interesting more than table is that, you can choose to number it or use bulletin. Although, you add those numbers and bulletin too in table but you do it manually, while with list elements, it will be added automatically. There are two types of html lists. The ordered html list and unordered html list. Below are the lists elements; Ordered html element. <ol> </ol> List html element. <li> </li> Unordered html element. <ul> </ul> List html element.<li> </li> Now let's move into the real practical part of the list making. ordered html list example; <! html DOCTYPE> <html> <head> </head> <body> <ol>  <li> Love </li> <li> Life </li> <li> Light </li>

CSS attributes and their effect

Image
  Today I want us to discuss about css attributes and their contribution to the language. Without these attributes css can't do much. But these attributes are not the much important tools for css. The styling language has bounce of elements to work with, but I bet, there are so many you will always skip when designing website. So very quickly, let me list the attributes we are to discuss now. Id attribute class attribute style attribute Maybe along the way you might come across more attributes, but these are ones we are going to talk about. Now let me explain one after the other. The id attribute is css attribute or tool use for naming html element for separate styling purpose.  The class attribute does same work with the id attribute. You use the class attribute in place of id, same thing to class. The style attribute actually seems like html attribute, but it actually belong to css.  The style attribute helps us style a single element within the element. Why I said it seems like

Primary steps to know genuine app or blog content in search engines

Image
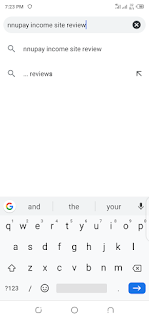
  Most people know how to use search engine to get information on the internet, but only few know how to get verified content. You may ask, what is verified content? When I mean verified content, I referring to genuine information. So, in today's lesson, I going to educate you on how to get or know legit information on the internet. When you type a search keyword on search engine input field and hit enter. There is going to be a lot information that will pop up. Both fake and real ones, but I guess getting the real one is a bit confusing. First thing is, those websites making review about the particular app or website. Is their url secured? Is it a popular website people rely on? Second thing is, how many different websites write review about this stuff you are looking for? Final thing is the comments on those review websites. What are those people who have tried the app or service saying about it. Note: If a website write review about a product or service, but the comment section

how to create new page on blogspot site

Image
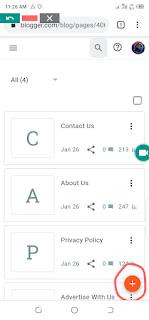
 My teaching always specialised on blogger only. So I'm going to teach you how to add those important pages for adsense approval. Before we move, I'm going to tell you why you need the above mentioned pages. Apart from those pages, you can use page creation to create a page that can contain specific information. I can boldly say, creating page is not limited to adding about us, contact us and privacy pages. Google AdSense need those pages because they make you open to your readers. Follow the steps below to and page in your blogspot site; Go to your blogger dashboard, click the menu icon and scroll down to pages. Click pages. When the next open properly, you will see the + icon telling to add page. Click on the + icon, then write the page title, and write the page content and click publish. Wow! You have successfully added new page in your blog. I'm always available for reply your comments.

Tips on how to connect domainking domain to blogspot blog

Image
 For those readers sending me emails, asking how to connect their domain name on domainking to a blogger blog. Here I come. I want to quickly teach you domain to blogspot blog. So I've already bought my domain. Quickly we are going to run through it.  Note: I'm doing this on automatic method. In other words, we are going to submit the name and the destination of the domain to domainking for automatic connection. So let's get started! Head go domainking domain name management area. And open another tab and go to your blogger dashboard and click the menu icon, click settings, then scroll down to CUSTOM DOMAIN. Now click the custom domain and enter your domain name and hit the SAVE button. Now blogger will send you error report containing your domain address and destination. At this point, what you need to do is to copy the name key and paste it on the domain management name input field and also do copy destination key and paste it on the value input field as shown on the scre

Tips to fix ads.txt file missing AdSense issue

Image
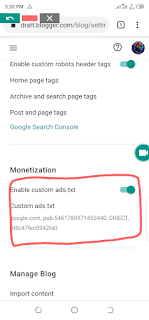
 Are you facing ads.txt file missing challenge on your AdSense account? Worry not, I got you covered.  Briefly, I want to show you how to fix your ads.txt file missing problem. When you login your AdSense account, you get to see notification on top of your account. From that notification end, you will see 'FIX NOW' link, click it and new window will open. From that new window, hit the download button and a let file download to your device. Now, after you have downloaded the file, go to your device download folder and open that ads.txt you downloaded. Now, if you are using Windows computer, open the file on notepad and copy the code and head to your blogger dashboard. When you get there, click on menu, the select settings, scroll down to monetization 'custom ads.txt' click it and paste the code you copied easier and put on the enable ads.txt button. Adding ads.txt file in manually created website.  So you already downloaded the file, right? Now go to your control panel a

Guide to add blog URL to Google search console

Image
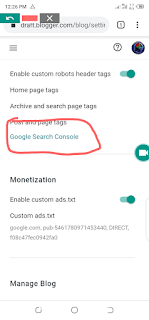
 In one of my recent blog posts, I explained how to submit your blog for AdSense approval and things you should do first before applying. Now, in this post, I want to teach you how to add your blog url to Google search console. maybe, you might ask why this is important. Calm down, I will explain why you need to add you blog to Google search console. For you to get better traffic result in blogging, your blog need to rank high in search engines. And Google is the world's number #1 search engine. So making your blog to show on search engines will fetch you a lot organic traffic. Now you see why you should consider adding your blog url to Google search console? This is exactly what I'm going to teach you on this post. mind you, I'm making this post for Blogspot users. So first, go to your blogger dashboard and click to open the menu tab, scroll down a bit and click settings. When the settings menu come up, scroll down and click Google search console. Now when the Google searc